iPhone / iPad · Step-by-step guide
Shadowrocket Setup Guide: From Adding Details to Testing Your Connection
Work through five steps in order: enter existing details, choose Global Routing, connect, verify the connection, and troubleshoot any issues. The screenshots below are from Shadowrocket’s App Store listing; the app layout may change, so follow the current interface.
Step 01 / Prepare a connection
Add a server or import an existing subscription
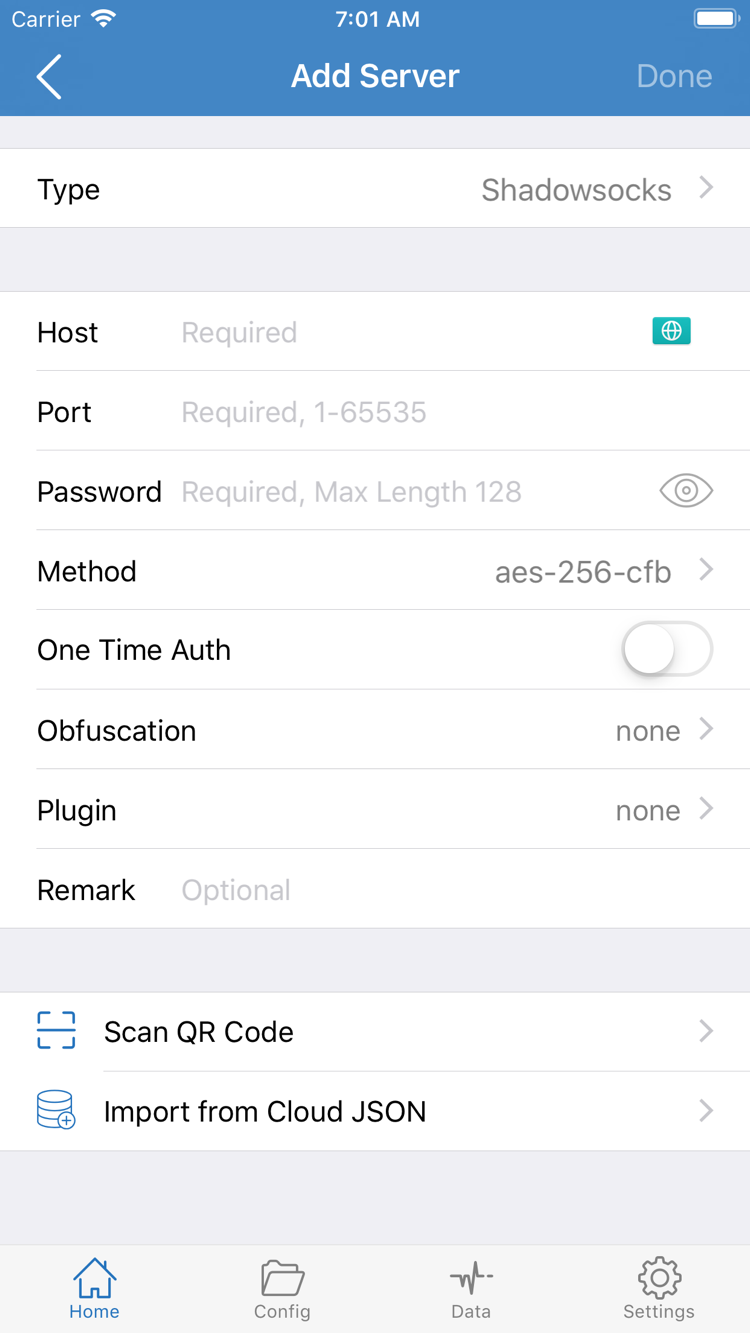
Open Shadowrocket and find Add Server on Home. If you have the details for a single server, open Add Server, choose the Type that matches the protocol in your information, then fill in Host, Port, and the authentication details required for that Type. The official screenshot on the right shows fields such as Type, Host, Port, Password, and Method in Add Server. Not every protocol uses every field; the options shown depend on the selected Type. Enter the server address in Host and the port separately. Do not enter a link as the Password.
Before entering the details, identify each field: the server’s domain or address goes in Host, the port number in Port, and the password, key, or other authentication details in the corresponding fields. If your details include extra parameters such as TLS or SNI, check the fields for the selected Type rather than guessing. Save your entries, return to Home, and confirm that the new item appears in the list. Seeing a name in the list only means the details were saved; it does not confirm that the server is reachable. Select the item and test it in the next step.
If you have your own subscription link, find Subscribe in the add flow, paste the complete link, and save it. Then use the update option shown in the interface to load the list. Check that the link is complete, including its beginning, end, and query parameters. Extra spaces or line breaks can also interfere when copying from a message. After updating, make sure the expected entries appear in the list, then select one to use. If the subscription list is empty, do not switch Global Routing yet. First check that the link is complete, the subscription is accessible, and the latest update succeeded.
Scanning is for when you already have the relevant QR code. On the Add Server page, choose Scan QR Code, grant camera access when prompted, check the scanned details, and save them. You may also see Import from Cloud JSON, which is a separate configuration import option; do not paste a regular subscription link into an incompatible field. Whether you enter details manually, use Subscribe, or scan a code, the step is complete when you can identify the entry in the Home list and its key fields match your existing information. For more on organizing, updating, and deleting entries, see the server management guide.
Step 02 / Decide how requests are handled
Choose a Global Routing mode
Once you have an entry to select, return to Home and find Global Routing. This setting determines how requests are handled; it is separate from whether your server details are correct. This guide refers to the three options as Config, Proxy, and Direct. Identify them by their English names in the interface. After changing the selection, check the current mode shown on Home so you know the change took effect.
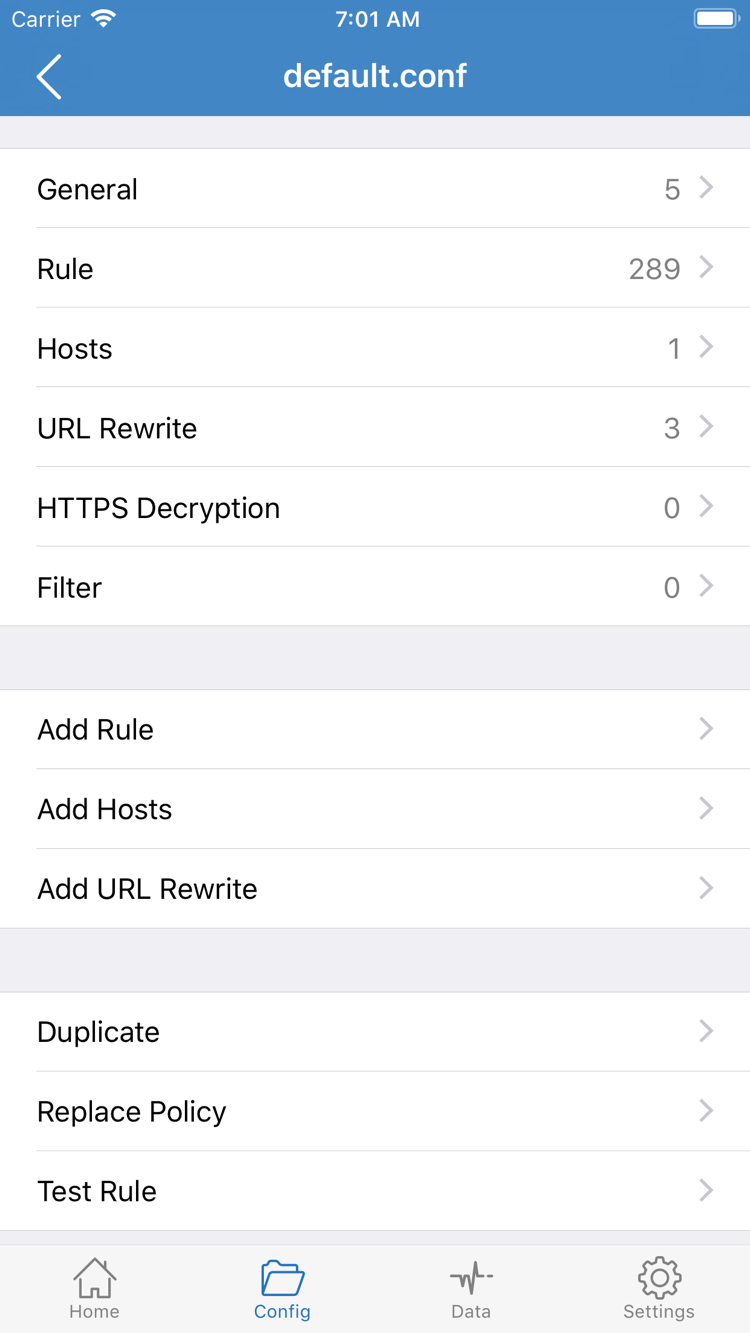
Choose Config to handle requests according to rules in a configuration file. Rules are typically evaluated one at a time, and the matching rule determines the policy. For example, one DOMAIN-SUFFIX rule might use PROXY while another uses DIRECT. Requests that do not match may be handled by later rules or the final policy in the configuration, so choosing Config does not mean every request uses the same server. On the Config page, use the screenshot to identify sections such as General, Rule, and Hosts. To check routing, focus on Rule and whether the selected configuration is the one you intend to use—not just the rule names.
Proxy is useful for a quick check of whether the selected server can handle requests: more requests use the current proxy route. However, this does not confirm that your Config rules are correct. Direct lets you check the direct route; opening a page in Direct does not prove that the server works. During troubleshooting, choose a mode that matches what you want to test: use Config for normal rule-based routing, switch to Proxy briefly to isolate the effect of rules, or use Direct to check requests without the current proxy route. Restore your usual mode after testing.
There is no need to rewrite rules when getting started. Begin with your existing Config and check that it includes the rules you need and that they are in the right order. Look more closely at matching conditions such as DOMAIN-SUFFIX and IP-CIDR, and policies such as PROXY, DIRECT, and REJECT, only if the connection is established and the test returns a result but specific requests are handled unexpectedly. Rule syntax and priority involve more detail; after completing this guide, see the Settings guide and Troubleshooting.
Step 03 / Connect
Turn on the connection switch on Home
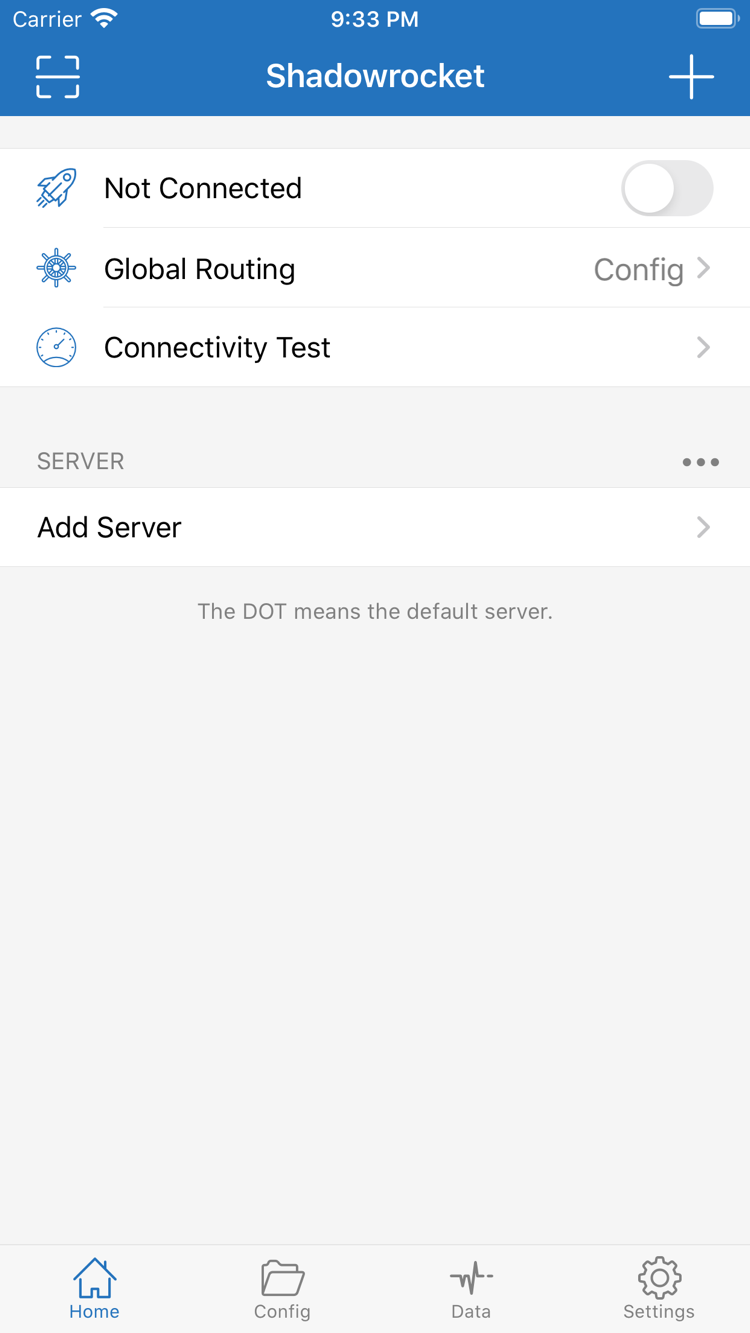
Return to Home and confirm that the server entry you just checked is selected, and that Global Routing shows the mode you want to test. The official Home screenshot can help you locate the Not Connected status and switch at the top, along with Global Routing, Connectivity Test, the SERVER section, and Add Server below. Select the entry before turning on the switch to avoid connecting to a different item when the list contains several entries.
After turning on the switch, read the system prompt carefully if it appears for the first time, then follow the system steps to confirm the VPN configuration. This authorization allows the device to establish the corresponding network configuration; without system confirmation, the switch may not complete the connection. Return to Home and check whether the status changes from Not Connected and the switch stays on. Check both the system status and what the app displays. If the switch turns off immediately, stays on Connecting, or the system prompt keeps reappearing, do not assume the problem is with routing rules.
Keep in mind that turning on the switch is not the same as confirming that requests are handled as expected. The switch indicates that a connection is being established or has been established; server details, subscription contents, the selected mode, and rules all affect what happens next. If you have multiple server entries, keep one selected while testing. Do not change both the entry and Global Routing with each attempt. This makes it easier to tell whether a difference came from the connection entry or the routing mode.
On iPad, use the same approach to find the entry, Global Routing, and the switch on Home. The layout may vary with screen width, but the English labels have the same functions. Once the connection stays on, continue with Connectivity Test and a real-world check. If the connection is not stable yet, first check system authorization, the selected entry, and the fields you entered. There is no need to change DNS or complex rules prematurely.
Step 04 / Check connectivity and routing separately
Use Connectivity Test to check the connection
Once Home shows that you are connected, use Connectivity Test for an initial check. Keep the same server entry and Global Routing mode throughout the test; avoid switching rapidly while it runs. Connectivity Test shows whether the connection works under the current test conditions. It does not guarantee access to every site or that every rule is working. An unexpected result on its own does not tell you whether the cause is a server field, network conditions, or a rule. Note the selected entry, mode, and result before moving on.
For a second check, try a service you actually need to access. With Config selected, check whether the request is handled according to the rules in the Config you are using. With Proxy, check whether the route through the selected server works. With Direct, you are checking the direct route. These results are not interchangeable. For example, if access works in Proxy but not as expected in Config, check Config and Rule before re-entering the server’s Host and Port. If access also fails in Proxy, changing a routing rule is usually not the first step.
You can repeat the check under the same conditions to rule out a temporary state after changing modes. Do not change the network, server, and configuration file at the same time; change one condition at a time so the results are comparable. If you have multiple server entries, keep Global Routing fixed and test each entry in turn. If you suspect a rule, keep the entry fixed and compare Config with a test mode. Narrowing down the cause step by step is more effective than repeatedly deleting and re-adding entries as soon as a page fails to load.
Step 05 / Find the cause one layer at a time
Common causes of failure: Check everything from server details to Settings
If the expected entry is missing from the start, go back to the import step. For manual entry, check Type, Host, Port, and the authentication fields required by the protocol. Look for extra spaces, a missing port, or a mismatch between your details and the selected Type. With Subscribe, check that the pasted link is complete, the list has finished updating, and the subscription contains server details. An empty list is an import or update issue; repeatedly toggling the Home switch will not fill in missing information. For more subscription import troubleshooting, see the subscription import troubleshooting checklist.
If the entry is present but the Home switch will not stay on, first confirm that the selected entry is the one you intend to test, then check that system authorization is complete. If the connection stays on but Connectivity Test does not return the expected result, check the server details and current network conditions, then try again using the same mode. If you have multiple entries, change only the selected entry for comparison; do not edit Config at the same time. This separates a connection that did not establish from one that is established but cannot reach the target.
If Connectivity Test returns a result but requests are handled incorrectly, first check that Global Routing is still set to the intended mode: Config, Proxy, or Direct. With Config selected, verify the Config file in use, Rule matching conditions and order, and the policy applied at the end. PROXY, DIRECT, and REJECT have different effects. The presence of a rule does not mean a request will match it. Before editing a rule, identify the specific request and intended policy. Change one relevant condition at a time, save, and test again.
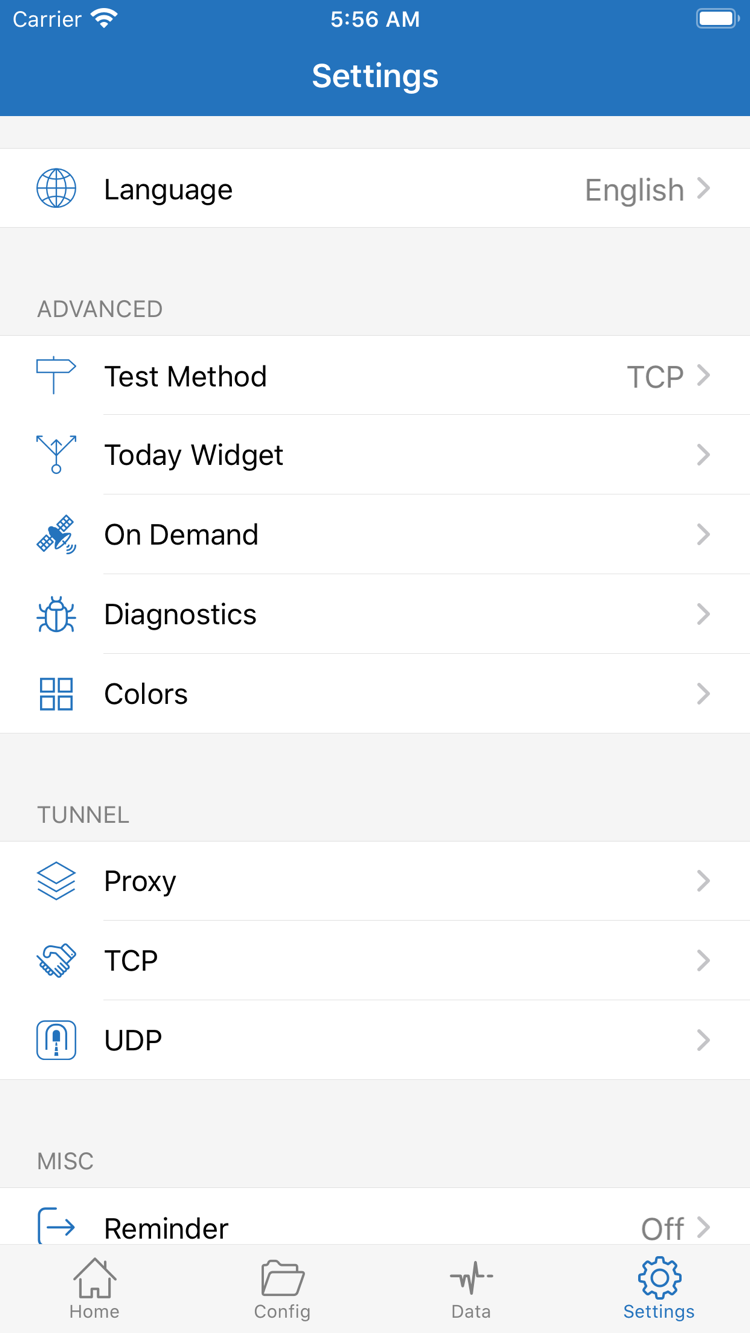
For more diagnostic options, open Settings. The official screenshot on the right shows Test Method, On Demand, Diagnostics, Proxy, TCP, and UDP. When troubleshooting, start by checking the information in Diagnostics, then confirm that Test Method matches the method you just used. If you use On Demand, check that its connection conditions match the current network. Avoid changing TCP, UDP, DNS, and On Demand all at once: if the result changes, you will not know which setting made the difference. For details on individual options, see the Settings guide.
After troubleshooting, restore Global Routing to the mode you normally use and repeat the Home status check, Connectivity Test, and real-world access check. If the issue persists, note whether you entered the details manually or used Subscribe, the selected Type, Home status, Global Routing mode, test result, and whether On Demand is enabled. Then check the relevant cases in Troubleshooting. Do not share passwords, keys, or complete subscription links when describing the issue.
After the initial setup
For everyday use, first confirm the selected server entry on Home, then check Global Routing. If the connection or access changes, work back through this page in order: details → mode → switch → test → Settings. To manage multiple existing subscriptions and learn about updating and organizing entries, see the server management guide. For specific errors or unexpected rule behavior, look for the relevant issue in Troubleshooting. Check purchase records, device compatibility, and system requirements against the App Store authenticity guide and the information listed on the App Store page.